Evaluation of the Internal Structure of the Multilayer Ceramic Mould for Precision Casting Critical Parts of Aircraft Engines by X-ray Computed Tomography
Received: 11-May-2018 / Accepted Date: 25-May-2018 / Published Date: 01-Jun-2018 DOI: 10.4172/2168-9806.1000189
Abstract
The aim of the study was to present the possibilities of X-ray computed tomography to evaluate the internal discontinuities in multilayer ceramic moulds for precision casting critical parts of aircraft engines.
Study for determination of internal discontinuities such as: porosity, micro-cracks and delamination at the ceramic moulds was carried out using the method of X-ray computed tomography. Using this method allowed to obtain a 3D virtual model of the ceramic form and, consequently, the measurement of porosity and thickness both the first layer and the constructional layer in the multilayer ceramic mould.
The results are presented possibilities of computer tomography as a tool for microanalysis 3D, identify internal discontinuities and measurement of geometrical size for assessing the quality of ceramic mold in relation to the research of its technological structure.
Keywords: X-ray computed tomography; Ceramic shell moulds; Precision casting
Introduction
In the process of manufacturing of the critical parts of aircraft engines, there is commonly used the method of precision casting in multilayer ceramic moulds (CM) referred to as the method of investment patterns. This method relay on reproducing a wax model that is a copy of a casting designed to be manufactured e.g. turbine blades of an aircraft engine. In ceramic moulds, there are distinguished layers that differ considerably one from another and have entirely different destination. The first layer (at the model) is designed to reproduce the original shape of the model and also to ensure that there is no chemical interaction with a model material during melting inside the autoclave, and to prevent the reaction between the liquid metal and the ceramic mould during casting of the liquid metal. Subsequent (constructional) layers are responsible for the mechanical strength of the mould, which should be high enough to prevent the mould from being damaged in the casting process and sufficiently elastic to avoid cracks in castings caused by too high stresses during crystallization of the casting. [1-4]. The purpose of the mould soaking process before casting of the metal is to remove remains of the model material, to remove organic compounds present in the applied binding materials and to bond in a best way all layers of the mould.
The basic components forming CM are: base material (e.g. sand grains or quartz flour) and binding material (mostly hydrolysed ethyl silicate – (C2H5O)Si). Presently, due to environmental regulations, more and more often is used more expensive binding material on the base of colloidal silica – sols of orthosilicic acid. It should be noted, however, that the ceramic mass with colloidal silica has a worse adhesion to the model than that of the ethyl silicate, which, in turn, adversely affects making replica of the wax model. Therefore, to ceramic compounds are added substances which modify the chemical composition of the first layer, improve its wettability and even prevent a formation of air bubbles [4,5].
Currently, the precision casting technology does not provide conditions for obtaining castings of a reproducible quality determined by shape, dimensions, surface condition and the size and distribution of internal discontinuities, at a level justified by economic considerations. In addition, there are no effective methods of controlling parameters of the process of forming multilayer ceramic moulds at each stage of its production.
Hence, the proposed method of X-ray computed tomography supplemented with a physicochemical analysis of the technological construction of a multilayer ceramic mould is a way of controlling its (technical) quality at all stages of its production. A tomographic recording based on an analysis of 2D and 3D images will provide insights into the internal structure of the investigated CM and, in particular, the detection of porosity, micro-cracks, their spatial distribution and causes of their forming [6].
Tested Materials and Research Methodology
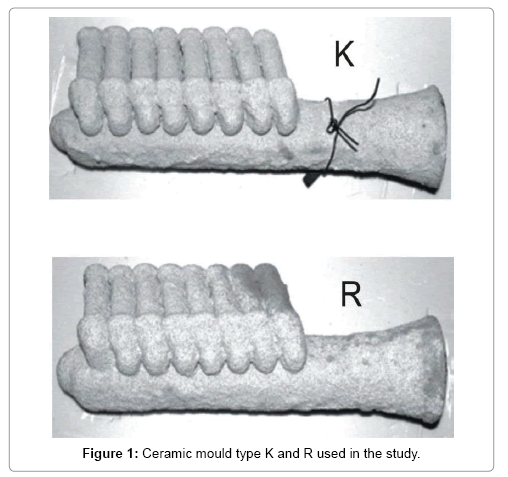
In this work, there were made 7-layer ceramic moulds for precision castings of critical parts of aircraft engines. The model moulds (Figure 1) were made by immersing the wax model set in suitable ceramic mixtures, which in turn were sprinkled with coarse grain ceramic powder. In order to prepare the moulds there were provided 2 ceramic mixtures. The selection of powders and binding materials was made on the basis of recognition of materials used in the industry. There were used materials commercially available in the offer of companies: Wacker Chemical Corporation (ethyl silicate), Grace Davision (Ludox), Remet UK (Remasol), Quartz Sand Mine “Grudzien Las” (flour and quartz sand). The composition of mixtures in the individual layers of CM is listed in Table 1.
| Type of mould | 1-st layer | Constructional layers(2-7) | Sprinkling |
|---|---|---|---|
| K | Base materialquartz flour (SiO2)75 µm,binding materialLudox | Base materialquartz sand fine grain(SiO2) 0.1-0.3 mm,binding materialwaterborne ethyl silicate | quartz sand fine grain,on the layer 7 coarse grain sand 0.5-1 mm |
| R | Base materialquartz flour (SiO2)75 µm,binding materialRemasol Premium Plus | Base materialquartz sand fine grain(SiO2) 0.1-0.3 mm,binding materialRemasol Plus | quartz sand fine grain,on the layer 7 coarse grain sand 0.5-1 mm |
Table 1: Composition of ceramic mixtures for individual layers of the ceramic mould (CM).
In the technology using binding materials based on hydrolysed ethyl silicate and water-dilutable colloidal silica, in the first layer to the binding material is added a filler of silica flour with very low granulation. The same silica flour is applied for sprinkling. In addition, in the first layer, to the binding material is added a modifier e.g. cobalt aluminate to modify the layer of the casting (breaking grain). In subsequent (constructional) layers, to the binding material there is added as filler the quartz sand of higher granulation (Table 1).
In liquid ceramic compounds used in the industrial practice of Polish precision foundries there are applied as binding materials:
• Hydrolysed ethyl silicate 40, being a heterogeneous mixture of ethyl orthosilicate SiO4(C2H5)4, a series of polysiloxanes (products of an incomplete hydrolysis of this compound) and organic compounds of silicon of branched structure. The chemical composition of binding material: SiO2 from 40.8 to 41.7%, HCI max. 0.0010%, tetraethyl orthosilicate to 20% and ethanol to 1.0%; density 1.07 g/m3 and pH 2,
Sols of silicon acid (Ludox), being a synthetic amorphous silica of chemical composition: SiO2 from 24.0 to 26.0%, Na2O from 0.32 to 0.56%, 0.01% NaCl and 0.03% Na2SO4, of density 1.21 g/ cm3, pH 9.9 and apparent viscosity 6 mPas,
• Aqueous colloidal silica (Remasol) of density 1.16 g/cm3, pH 10.3 and apparent viscosity 5.5 mPas.
• The ceramic materials most commonly used in Polish precision foundries are quartz sands of chemical composition: 98.51% SiO2, 0.17% Fe2O3, 0.05% carbonates, 0.63% Al2O3, 0.13% MgO, 0.18% CaO and 0.12% losses of roasting.
In order to confirm the effectiveness of selection of the ceramic materials, there was made an investigation of chemical and phase composition and particle size distribution. There were also made measurements of the potential zeta for individual powders in the mixture, allowing for the quantitative characteristic of powders propensities to agglomerate in the suspension. To measure colloidal particles sizes of the binding material Ludox, Remasol Premium Plus and Remasol Plus there was used the method of dynamic light diffusion (PCS). For measurements there was applied the laser diffraction instrument – ZETASIZER NANO. This method also makes possible to determine the electrophoretic mobility of particles (zeta potential). Zeta potential measurements were performer using the microelectrophoresis pulse method.
Microstructures were also observed in FEI’s Scios scanning microscope. In addition, there was estimated the porosity of ceramic moulds made from the above mentioned ceramic mixtures. An X-ray technique of computed tomography (CT) was used to estimate CM porosity. The high resolution tomex|x L-450 computed tomograph was used for measurements, enabling performing spatial examinations (3D) and inspection of internal discontinuities (2D). Parameters of the exposure were as follows: voltage on the lamp U=180 (kV), current intensity I=220 (μA), number of exposures 2200, X-raying resolution 44.7 μm.
The mechanical strength of ceramic moulds was determined in a static bending test. The test was performed under conditions of 4-point bending of square-section beams. Measurements were made on the device for measuring strength of ceramic samples, developed at Foundry Research Institute, at spacing of supports L=25 mm. Samples were loaded to the breaking point at a rate 1 mm/min, recording the value of breaking strength. The bending strength of the ceramic material was determined using the formula:
 (1)
(1)
Where, σf: strength of samples (breaking strength on bending) (MPa);
Ff: breaking load (N);
L: spacing of supports (mm);
l: load distribution (mm);
d: sample width (mm);
h: sample height (mm).
Results and Discussion
Analysis of physicochemical properties of moulding mixture components
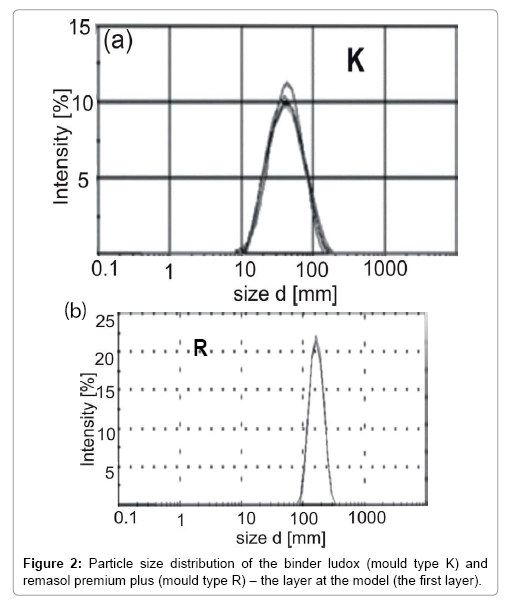
An average particle size of the quartz powder being the filler of mixture for the first layer (at the model) in K and R moulds was 75 μm. The result of particle size testing by laser diffraction method in the binding material Ludox and Remasol Premium Plus for the layer at the model was presented in Figure 2. The curve of particle size distribution takes a form of unimodal character, which shows the presence of homogeneous size particles. An average particle size in Ludox binding material was determined for 36.3 nm, in Remasol Premium Plus for 163.4 nm. It is worth to note that the grain composition in the layer at the model determines the smoothness of casting surface, but using a base material with too fine grain causes a decrease in the permeability of hardened mass and increases the consumption of binding material.
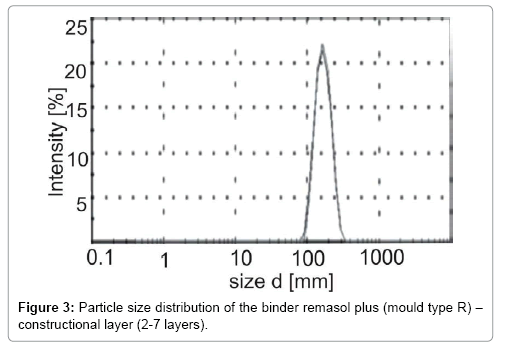
The average particle size of the quartz sand filler applied to the construction layers was 0.2 mm. The particle size was possible to be determined only in Remasol Plus binding material: the average particle size of SiO2 was 171.8 nm (Figure 3). Analysis of the obtained distribution of powder particle sizes allows making conclusion that the powders introduced into suspensions have unimodal distributions, which in turn indicates the presence of particles of equal size.
For sprinkles of constructional layers (except the last one) was used the same material as for the base material of constructional layers, i.e. fine quartz sand. The high degree of reduction in the mixture size increases the probability of obtaining more favourable technological properties of ceramic casting compounds, such as: plasticity, change in kinetics of surface phenomena (absorption capacity of water molecules to the surface).
Results of measurements of the zeta potential – a parameter describing the behaviour of particles in the suspension, for Ludox and Remasol Premium Plus binding material (applied to layers at the model), are shown in Figure 4. This measurement indicates, that the particles suspension in Ludox as well as in Remasol Premium Plus binding material is stable over time (there is no tendency to agglomeration). The isoelectric suspension point for these binding materials is -46.0 mV and -41.5 mV respectively. These results indicate that, despite the significant difference in particle sizes in Ludox and Remasol Premium Plus binding material, there should be no significant changes in technological parameters of these mixtures.
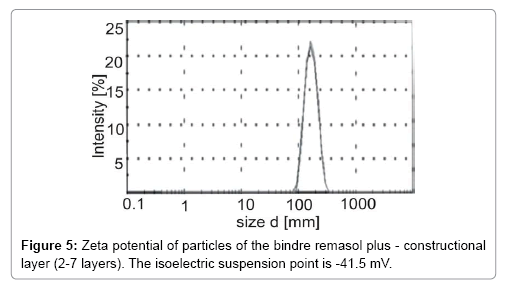
It is worth to note, that in Remasol Plus binding material used in the constructional layers also the particles suspension is stable over time (there is no tendency to agglomeration). The isoelectric suspension point for this binding material is -41.5 mV (Figure 5).
Microstructural analysis of cross sections of CM samples
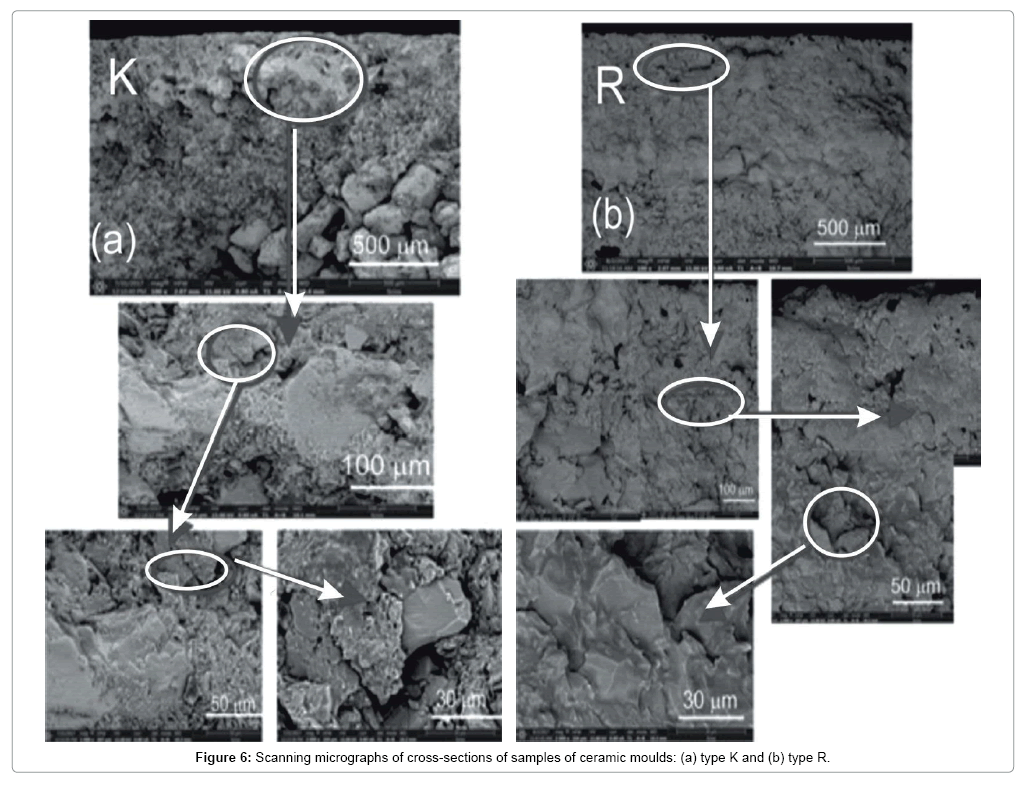
The results of microscopic observations using scanning electron microscopy indicate a more developed surface of SiO2 particles and their differentiation in size and shape for compounds with alcoholic binding material (Figure 6). Compounds with colloidal silica have a more compact structure, SiO2 particles are sharp-edged and irregular and smaller in size, which is likely to favour better coverage of the wax model surface (ensures a better compaction in the model compound). Particles of smaller sizes have slower sedimentation, providing a uniform consistency of the poured compound in the mould making process.
These particles form the stable three-dimensional structures – agglomerates (in the process of CM drying, as a result of water evaporation, the silica is being sol-gel converted). As a result of the reaction between the hydroxyl groups from the surface of silica particles, the SiO2 particles interconnect in three-dimensional structures by Si- O-Si bonds, which as a consequence ensure good strength properties of CM.
Determination of bending strength
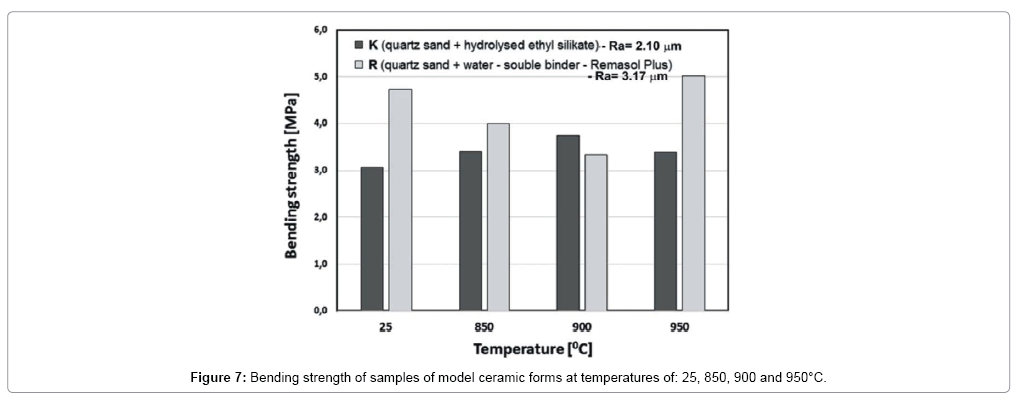
Figure 7 and Table 2 show the maximum bending strengths for K and R moulds in the “raw state” and after the annealing process at temperatures T=850, 900 and 950°C. The highest bending strength is characteristic to R type CM after annealing at the temperature T=950°C for 1 h. This is due to the fact that at this temperature takes place the process of sintering of the ceramic mould material, which significantly increases the mechanical strength. These moulds have also better surface quality; Ra parameter equals to 2.10 μm. This means that CM, based on water binding materials, are characterized by greater resistance to failure during the process of wax model melting and pouring the liquid alloy. However, CM type K was characterized by higher parameter Ra=3.17 μm, and the highest strength was obtained after annealing at the temperature T=900°C. Hence, these moulds should be soaked in the temperature range 900-920°C, after exceeding of which the mould strength will decrease. Dimensional changes of quartz powder, used as a compound base material during heating and roasting of moulds above 900°C, can cause dimensional deformation of castings and poor surface smoothness.
| Type of mould | Thickness of the 1-st layer (mm) | Thickness of the construction layer (2-7) (mm) |
|---|---|---|
| K | 1.03 | 7.32 |
| R | 0.98 | 9.15 |
Table 2: Results of measuring the thickness of the first and construction layer in ceramic moulds by computed tomography method.
Assessment of the porosity of ceramic moulds types K and R
To evaluate the porosity of ceramic mould there was used an X-ray computed tomograph. The idea of measurements consisted of assembling three-dimensional spatial object from multiple flat images as a result of X-raying of the examined element in the pre-set angular positions. The obtained results were used to compare the types of ceramic moulds (K and R) for the level of porosity and to reveal other discontinuities of internal porosity.
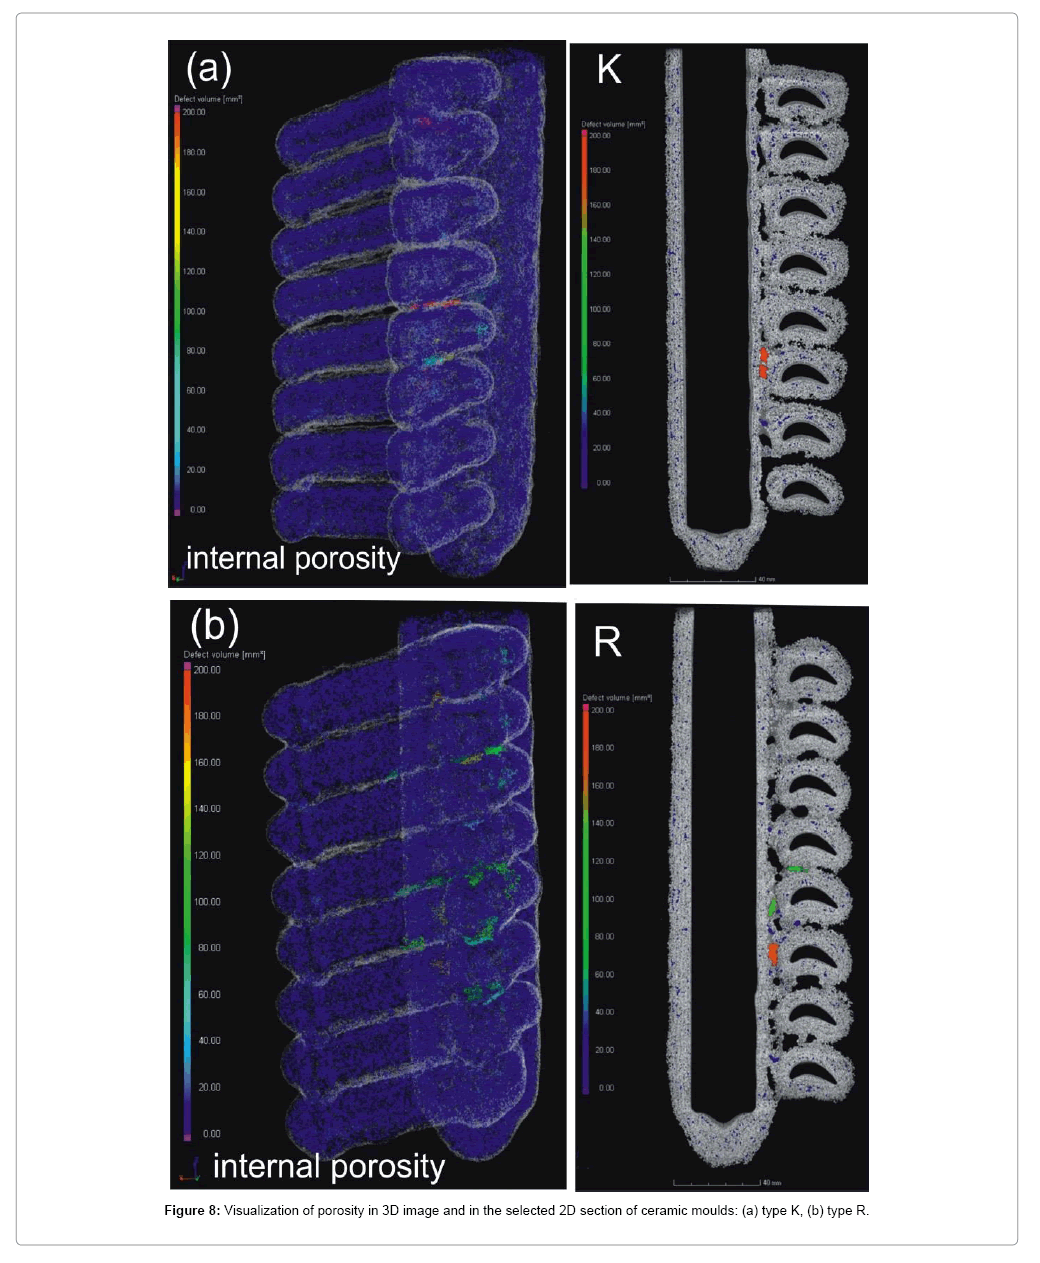
Porosity of ceramic casting moulds (type K and R) is similar and is included in the range of 2.6-2.9%. The distribution of pores is uniform on the layers cross-sections, which guarantees a sufficient permeability of moulds. It has been noted, however, that in R type moulds, larger pore clusters of substantial size are present in the areas of connection of the gating system with the “blade” (Figure 8). The location of porosity in these areas should not, however, affect the reduction of mechanical durability CM of type R, due to the fact that the thickness of the following seven (constructional) layers in the mould type R is about 25% higher, while maintaining the thickness of the first layer (at the model) as for the moulds type K (Table 2).
The thickness measurement results of the obtained CM layers indicate that the thickest constructional layers were obtained in moulds type R, while the thicknesses of layers at the model for the moulds type K and R are similar. It is worth to emphasize, that even the local disturbances in the mould wall thickness and in the continuity of its structure change the conditions of crystallization (mainly the conditions of heat dissipation from the poured mould) and potentially cause defects disqualifying the final product. Apart from this, an excessive variation of the wall thickness may cause shape defects, knobs, swell, or even cracks of the mould during casting. Also, the results relating to the bending strength of sample models of the mould type R indicate the high mechanical durability of ceramic moulds. Furthermore, the pores distribution is effected by the binding material used in the process of precision casting. When replacing ethyl silicate with Remasole, the largest porosity clusters occur in connecting areas of the gating system-blade.
Summary
The developed method of measuring the porosity of multilayer ceramic moulds by X-ray computed tomography supplemented by the physicochemical analysis of the technological construction of the multilayer ceramic mould is an effective way of quality (technical) control at all stages of their production.
It has been demonstrated, that quartz based multi-layered ceramic moulds with water-dilutable and alcohol based binding materials for precision casting of critical parts of aircraft engines meet the basic technological criteria applied in the precision foundries:
• The porosity of ceramic moulds is comparable to the both applied binding materials,
• As a result of the introduction of “water dilutable” binding material in the place of ethyl silicate, there was improved the mechanical durability and the quality of ceramic moulds.
Using the proposed methods in industrial practice will allow increasing the efficiency of the process, reducing the probability of a defective mould and faulty casting, which translates into the significant economic savings.
Acknowledgements
This work has supported by The National Centre for Research and Development under the project No PBS3/A5/54.
References
- Boccalini M, Correa E (1996) Effect of binder/filler ratio on hot strength and hot permeability of investment casting ceramic moulds. International Journal of Cast Metals Research 9:133-137.
- Karwiński A, Sobczak N, Leśniewski W,Wieliczko P (2010) in Proceedings of the 69thWorld Foundry Congress.
- Okhuysen V, Voigt RC (1994) in Proceedings of 42ndAnnual Technical Meeting ofInvestment CastingInstitute, Atlanta, USA, Paper 23.
- Myszka D, Karwiński A, Leśniewski W, Wieliczko P (2007) Influence of the type of ceramic mouldingmaterials on the top layer of titanium precision castings.Archiv Foundry Eng 7: 153-156.
- Haratym R, Lewiński J, Biernacki R, Kowaluk T (2012) Anisotropy of ceramic moulds physical propertieswhichaffect environmentally friendly production of precision aluminum castings.Archiv Foundry Eng 12: 53-56.
Citation: Tchorz A, Ksiazek M, Krzak I, Szczepaniak-Lalewicz K, Zaba K, et al. (2018) Evaluation of the Internal Structure of the Multilayer Ceramic Mould for Precision Casting Critical Parts of Aircraft Engines by X-ray Computed Tomography. J Powder Metall Min 7: 189. DOI: 10.4172/2168-9806.1000189
Copyright: © 2018 Tchorz A, et al. This is an open-access article distributed under the terms of the Creative Commons Attribution License, which permits unrestricted use, distribution, and reproduction in any medium, provided the original author and source are credited.
Select your language of interest to view the total content in your interested language
Share This Article
Recommended Journals
Open Access Journals
Article Tools
Article Usage
- Total views: 4831
- [From(publication date): 0-2018 - Nov 13, 2025]
- Breakdown by view type
- HTML page views: 3844
- PDF downloads: 987
